Install OpenResty Edge
1. Architecture
OpenResty Edge contains three main roles (OpenResty Edge Admin, OpenResty Edge Log Server, OpenResty Edge Node), and the relationship between the three components is as follows:
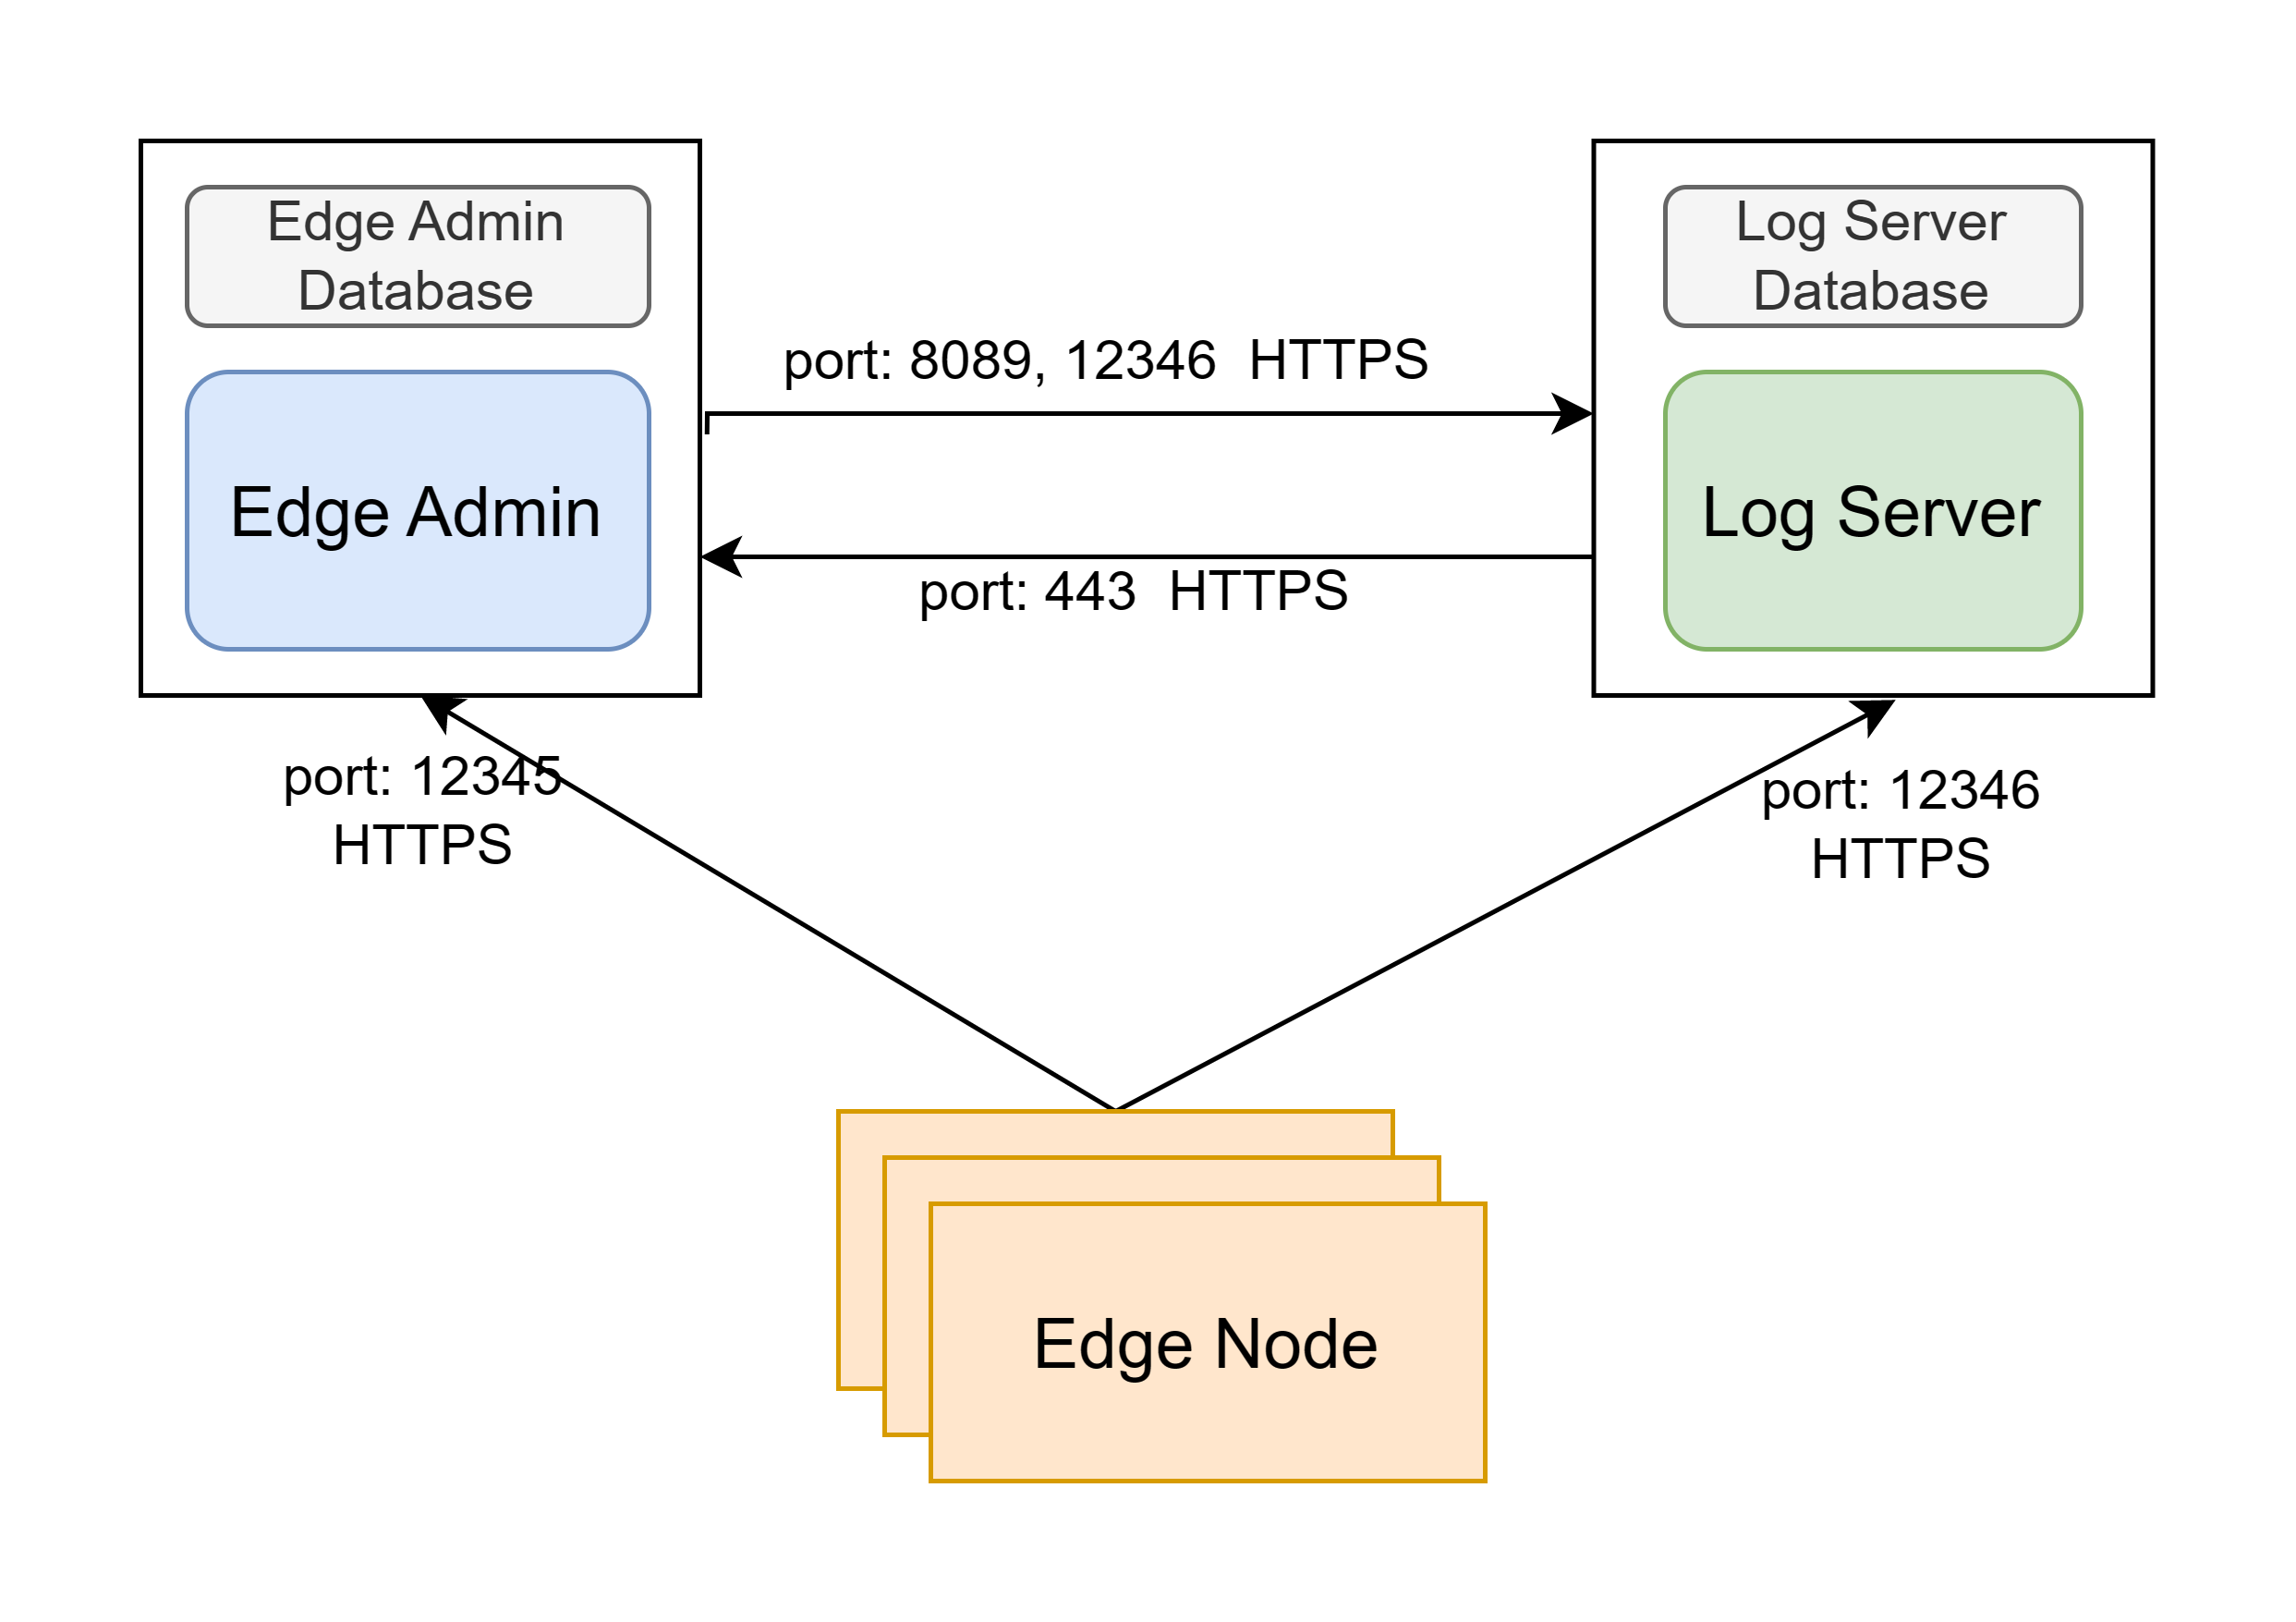
- OpenResty Edge Admin: Edge Admin for short, used to control and manage the OpenResty Edge Node.
- OpenResty Edge Log Server: short for Log Server, Used for metrics, log storage and viewing.
- OpenResty Edge Node: Edge Node for short, is the gateway server that carries user traffic.
In addition, there are two data storage roles.
- OpenResty Edge Admin Database: Edge Admin Database for short, is the database used by Edge Admin to persist the Edge Node’s configuration.
- OpenResty Edge Log Server Database: Log Server Database for short, is the database used by Log Server to persist Edge Node’s metrics and log data.
2. Deployment recommendation
A formal environment installation of OpenResty Edge requires at least three machines, with Edge Admin, Log Server, and Edge Node components installed.
If you are deploying a test environment, Edge Admin and Log Server can also be installed on the same machine.
For gateway clusters with a scale of about 10 nodes, we recommend the following:
Edge Admin: A machine with at least a 4-core processor, 16G RAM and a 200G SSD hard drive.
Log Server: A machine with at least a 4-core processor, 16G RAM and a 200G SSD hard drive.
Edge Node: relatively flexible, depending on business volume, roughly 1 core with 2G memory; the larger, the better. For example, 8 cores, 16 GB of memory, and a 200G hard drive.
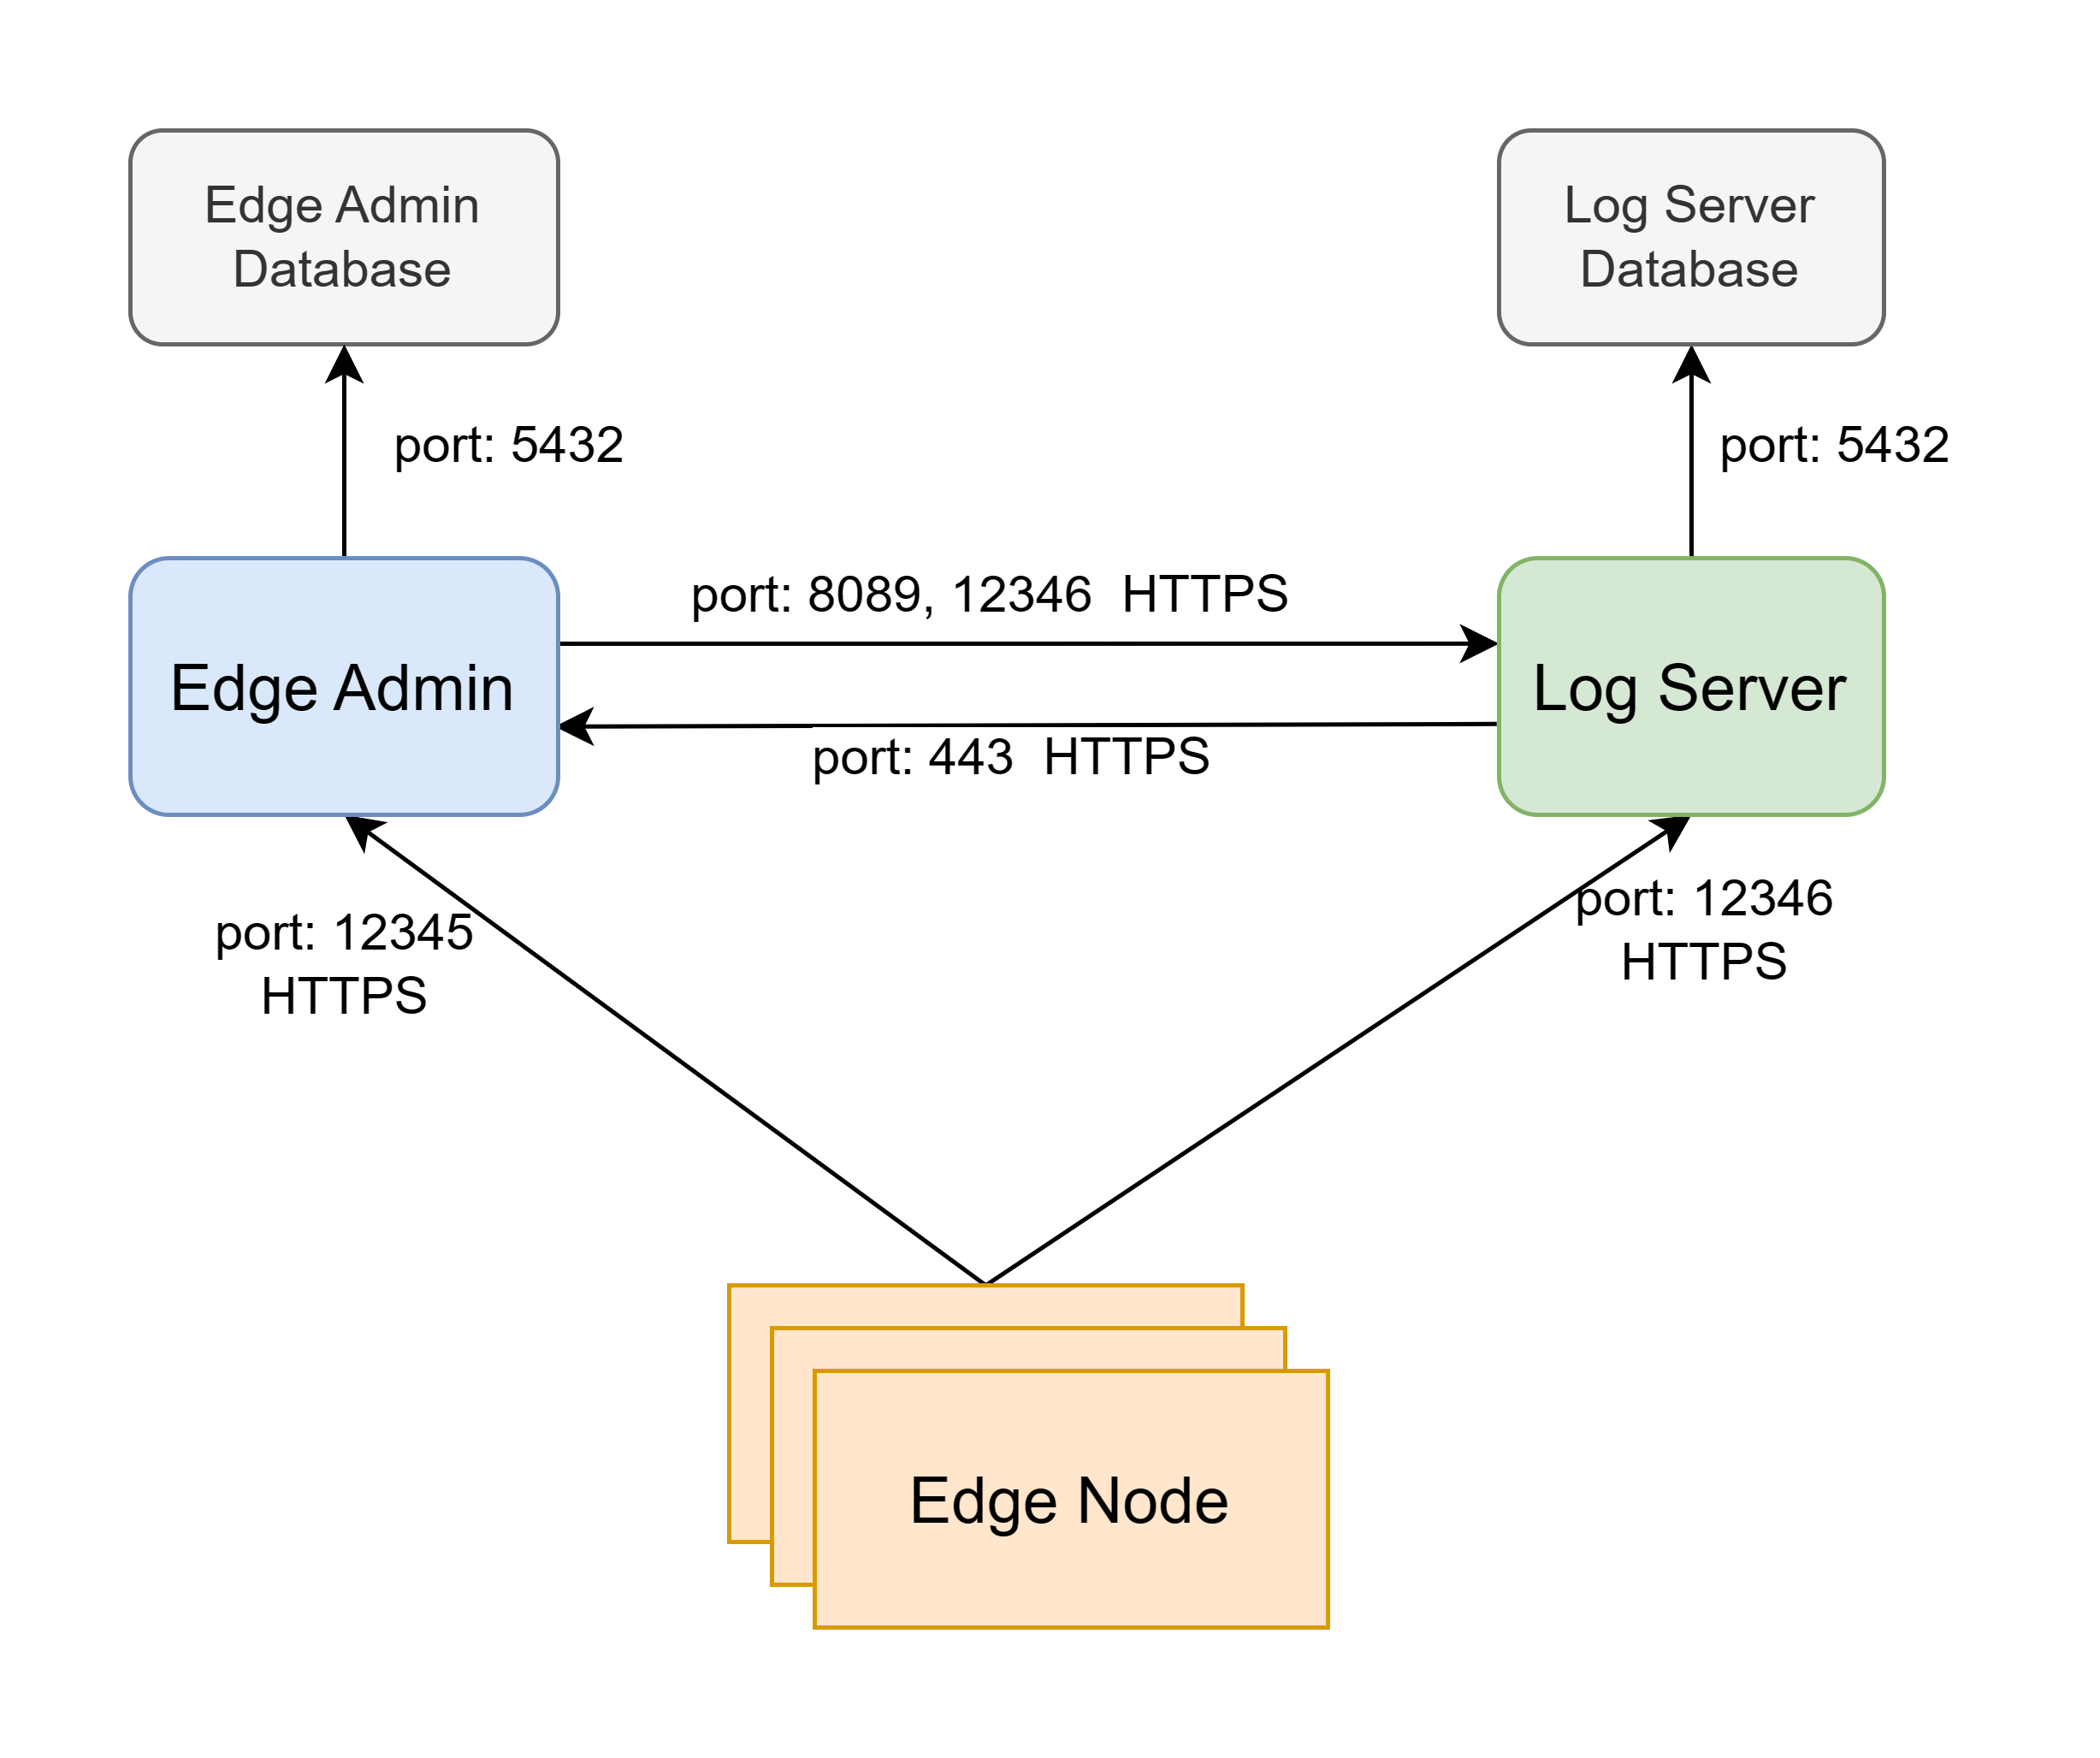
For the environment with more than 10 nodes, you need to upgrade the configuration according to the actual scenario, and for larger clusters, you can also deploy Edge Admin Database and Log Server Database to separate machines, as shown in the following figure.
To make sure data security, we recommend to follow the section Database Backup and High Availability for configuration.
3. Installation
If you would like to proceed with an online installation (recommended), please prepare the following file:
openresty-edge-VERSION.tar.gz: Contains the OpenResty Edge configuration package and initial data.
If you prefer to install using a bundle package, please prepare the following file:
openresty-edge-bundle-VERSION.tar.gz: Contains OpenResty Edge’s service package, configuration package, and initial data, etc. The old name wasopenresty-edge-bundle-VERSION.tar.gz.
These two files will be provided in the Download Center. Please contact us if they are not available.
3.1 Setting Up Firewall Whitelist
The machines where Edge Admin, Edge Node, and Log Server are located will access the following public network addresses for downloading software and synchronizing authorization information. If there is an outbound firewall, you need to open a whitelist to allow access to these addresses:
openresty.com 443
openresty.org 443
pkg.openresty.com 443
api.openresty.com 443
3.2 OpenResty Edge Admin Database Installation
If the Edge Admin and Edge Admin Database are deployed on two separate machines, the machine with the Edge Admin Database needs to open port 5432 for the Edge Admin.
3.2.1 Installation
Copy the
openresty-edge-VERSION.tar.gzoropenresty-edge-bundle-VERSION.tar.gzarchive to the current directoryUnzip
tar -xvf openresty-edge-VERSION.tar.gzor
tar -xvf openresty-edge-bundle-VERSION.tar.gzRun the installer
cd openresty-edge-VERSION
sudo /bin/bash openresty-edge-installer.sh
or
cd openresty-edge-bundle-VERSION
sudo /bin/bash openresty-edge-installer.sh
Enter the action you want to perform
Install> Checking network... > Welcome to the OpenResty Edge Installer. [1] Install [2] Upgrade [3] Downgrade [4] Uninstall [5] Self Check [6] Get Default Info What would you like to do? 1 > You chose: Install.Enter the version you want to install (you can get the latest version information from the changelog). If you want to use the default version in the installer, just press Enter
Which version would you like to install? (Default: 23.12.1, Press Enter to use the default version)Enter the component you want to install
Edge Admin Database[1] Edge Admin Database [2] Edge Log Server Database [3] Edge Admin [4] Edge Log Server [5] Edge Node Which component would you like to install? 1 > You chose: Edge Admin Database.Enter the list of IP addresses allowed for remote database access, separated by spaces; if only local access is allowed, just press Enter. If your database and Edge Admin are not on the same machine, you should enter the IP address of the Edge Admin
[+] Please enter the list of IP addresses allowed for remote database access (default: 127.0.0.1/32 ::1/128):Set a password for the default database user
postgres, please remember this password. This database user has no password by default[+] Please enter the password for the database user "postgres", or press Enter to continue without setting a password: [+] Please confirm the password for the database user "postgres":
3.2.2 Verifying Installation
You can check if the service has started normally with the following command
sudo systemctl status openresty-postgresql12or
journalctl -u openresty-postgresql12
3.3 OpenResty Edge Admin Installation
The Edge Admin machine needs to open ports 443 and 12345, with port 443 used for accessing the Edge Admin management backend, and port 12345 used for communication with the Edge Node component.
3.3.1 Installation
Notice
Please use the same version of openresty-edge-install.sh as when installing the OpenResty Edge Admin Database.The operation steps are similar to above; when installing, select the component
Edge Admin[1] Edge Admin Database [2] Edge Log Server Database [3] Edge Admin [4] Edge Log Server [5] Edge Node Which component would you like to install? 3 > You chose: Edge Admin.Configure the certificate and private key
This certificate is used to access the Edge Admin management backend. Configuring this certificate allows you to access the Edge Admin management backend using a domain name. Certificates can be obtained from SSL certificate providers such as Let’s Encrypt, ZeroSSL, or generated using the openssl tool for self-signed certificates. If you do not have a certificate yet, you can skip this step for now, and the default self-signed certificate from OpenResty Edge will be used, which means you can only access the management backend via IP later on.
[+] Do you want to configure SSL certificate and private key? [y/N] y
[-] Please enter the path of the SSL certificate file (like /etc/ssl/ssl.crt): /home/user/ssl/ssl.crt
[-] Please enter the path of the SSL key file (like /etc/ssl/ssl.key): /home/user/ssl/ssl.key
Configure the Database and Log Server addresses (if Database, Edge Admin, and Log Server are all on the same machine, you can directly use the default configuration)
[+] Do you want to configure admin database and log server address (/usr/local/oredge-admin/conf/config.ini)? [y/N] y
[-] Please enter the address of the admin database (if admin database and admin use the same machine, no need to input.):
[-] Please enter the address of the log server (if log server and admin use the same machine, no need to input.): 54.112.79.32
Please ensure that the current server can connect to the entered IP.
If successful, there will be a prompt as follows, including the login password for Edge Admin
> Install OpenResty Edge admin successfully! login username: admin , password: xxxxxxxxxxx .
3.3.2 Verifying Installation
You can check if the process has started with the following command:
sudo systemctl status oredge-adminYou can also check the Edge Admin logs for any abnormal information. The log directory is
/usr/local/oredge-admin/logs, and you can get the latest log content with the following commandsudo ls -rt /usr/local/oredge-admin/logs/error* | tail -n1 | xargs -i sudo tail -n 50
At this point, the Edge Admin can be used normally, and you can access the management backend via https://your_domain/.
If you did not configure a certificate earlier, the self-signed certificate provided by us will be used, and you can only access via https://admin_ip/, and you will need to ignore the browser’s certificate error prompts to access it normally.
3.4 OpenResty Edge Log Server Database Installation
3.4.1 Installation
The operation steps are similar to above; when installing, select the component
Log Server Database[1] Edge Admin Database [2] Edge Log Server Database [3] Edge Admin [4] Edge Log Server [5] Edge Node Which component would you like to install? 2 > You chose: Edge Log Server Database.Enter the list of IP addresses allowed for remote database access, separated by spaces; if only local access is allowed, just press Enter. If your database and Edge Log Server are not on the same machine, you should enter the IP address of the Edge Log Server
[+] Please enter the list of IP addresses allowed for remote database access (default: 127.0.0.1/32 ::1/128):Set a password for the default database user
postgres, please remember this password. This database user has no password by default[+] Please enter the password for the database user "postgres", or press Enter to continue without setting a password: [+] Please confirm the password for the database user "postgres":
3.4.2 Verifying Installation
You can check if the process has started with the following command:
sudo systemctl status openresty-postgresql12or
journalctl -u openresty-postgresql12
3.5 OpenResty Edge Log Server Installation
The Log Server machine needs to open ports 12346 and 8089, with port 12346 used for communication with the Edge Node, and port 8089 used for communication with Edge Admin.
3.5.1 Installation
The operation steps are similar to above; when installing, select the component
Log Server[1] Edge Admin Database [2] Edge Log Server Database [3] Edge Admin [4] Edge Log Server [5] Edge Node Which component would you like to install? 4 > You chose: Edge Log Server.Configure the Log Server Database and Edge Admin addresses (if the Log Server Database, Edge Admin, and Log Server are all on the same machine, you can directly use the default configuration)
[+] Do you want to configure database and admin address (/usr/local/oredge-log-server/conf/config.ini)? [y/N] y
[-] Please enter the address of the log server database (if log server database and log server use the same machine, no need to input.):
[-] Please enter the address of admin (if admin and log server use the same machine, no need to input.): 45.121.32.78
Please ensure that the current server can connect to the entered IP.
If successful, there will be a prompt as follows
> Install OpenResty Edge Log Server successfully!
3.5.2 Verifying Installation
You can check if the process has started with the following command:
sudo systemctl status oredge-log-serverYou can also check the Log Server logs for any abnormal information. The log directory is
/usr/local/oredge-log-server/logs, which will be rotated daily. You can get the latest log content with the following commandsudo ls -rt /usr/local/oredge-log-server/logs/error* | tail -n1 | xargs -i sudo tail -n 50
3.6 OpenResty Edge Node Installation
3.6.1 Installation
The operation steps are similar to above; when installing, select the component
Edge Node[1] Edge Admin Database [2] Edge Log Server Database [3] Edge Admin [4] Edge Log Server [5] Edge Node Which component would you like to install? 5 > You chose: Edge Node.Configure the Edge Admin and Log Server addresses:
[+] Do you want to configure admin and log server address (/usr/local/oredge-node/conf/config.ini)? [y/N] y
[-] Please enter the address of admin: 54.212.32.78
[-] Please enter the address of log server: 54.212.32.78
Please ensure that the current server can connect to the entered IP.
If successful, there will be a prompt as follows
> Install OpenResty Edge Node successfully!
3.6.2 Verifying Installation
You can check if the process has started with the following command:
sudo systemctl status oredge-nodeYou can also check the Edge Node logs for any abnormal information. The log directory is
/usr/local/oredge-node/logs, and you can get the latest log content with the following commandsudo ls -rt /usr/local/oredge-node/logs/error* | tail -n1 | xargs -i sudo tail -n 50If the logs include the following output, it indicates that the Edge Node has successfully connected to the Edge Admin. You can approve the node to join in the Edge Admin management backend and use it normally. You can refer to Gateway Cluster.
2021/11/16 14:37:38 [error] 6882#6882: *51983 [lua] privileged.lua:819: could not establish node identity: not yet approved, context: ngx.timer
At this point, the entire OpenResty Edge setup is complete.
3.7 Configuring Two Copies of OpenResty Edge Admin Services (Optional)
If you wish to improve the availability of Edge Admin services, consider deploying two copies of Edge Admin services, configured as dual-master. The steps are:
Install another set of Edge Admin software according to the steps in 3.3 above
Modify the Edge Admin configuration
# This file will not be overwritten by future upgrades, please pay attention to not leave any spaces at the beginning of lines
sudo vim /usr/local/oredge-admin/conf/config.ini
Modify the
hostfield under theclone_adminsection, each Edge Admin should configure the address of the other Edge Admin service.Restart the Edge Admin service after modification:
sudo systemctl start upgrade-oredge-adminAt this point, the two Edge Admin services are in dual-master mode, and accessing any Edge Admin will have the same effect.
Modify the Edge Node configuration
# This file will not be overwritten by future upgrades, please pay attention to not leave any spaces at the beginning of lines
sudo vim /usr/local/oredge-node/conf/config.ini
Modify the
host2field under theadminsection in the configuration file to the address of the other Edge Admin.Restart the Edge Node service after modification:
sudo systemctl start upgrade-oredge-nodeThe Edge Node will randomly use
hostandhost2(regardless of the order of configuration), and will automatically switch to the other Edge Admin service if one of them goes down.
3.8 Multiple OpenResty Edge Log Server (Optional)
If you wish to enhance the availability of the Log Server service, you can consider deploying multiple Log Server instances.
Support for multiple Log Server instances requires that the version of the OpenResty Edge is equal to or higher than 23.12.1.
The steps are as follows:
Follow the steps in section 3.5 to install additional Log Server instances
Modify the Edge Admin configuration
# This file will not be automatically overwritten by subsequent upgrades, please be careful not to leave any spaces at the beginning of lines
sudo vim /usr/local/oredge-admin/conf/config.ini
Modify the
endpointsfield underlog_serverto add the connection address of the newly deployed instance, for example:[log_server] endpoints = "https://192.168.0.2:12346, https://192.168.0.3:12346"After modification, restart the Edge Admin service:
sudo systemctl start upgrade-oredge-adminEdge Admin will randomly use the configured Log Server instances, regardless of the order of configuration. If a Log Server instance goes down, it will automatically switch to another available Log Server service.
Modify the Edge Node configuration
# This file will not be automatically overwritten by subsequent upgrades, please be careful not to leave any spaces at the beginning of lines
sudo vim /usr/local/oredge-node/conf/config.ini
Modify the
endpointsfield underlog_serverto add the connection address of the newly deployed instance, for example:[log_server] endpoints = "https://192.168.0.2:12346, https://192.168.0.3:12346"After modification, restart the Edge Node service:
sudo systemctl start upgrade-oredge-nodeEdge Node will randomly use the configured Log Server instances, regardless of the order of configuration. If a Log Server instance goes down, it will automatically switch to another available Log Server service.
3.9 Using the Installer for Self-Check
$ bash openresty-edge-installer.sh
> Checking network...
> Welcome to the OpenResty Edge Installer.
[1] Install
[2] Upgrade
[3] Downgrade
[4] Uninstall
[5] Self Check
[6] Get Default Info
What would you like to do? 5
> You chose: Self Check.
3.10 Using the Installer to Get Default Login Information for Edge Admin
Notice
Please use the same version of openresty-edge-install.sh as when installing the OpenResty Edge Admin Database.$ bash openresty-edge-installer.sh
> Checking network...
> Welcome to the OpenResty Edge Installer.
[1] Install
[2] Upgrade
[3] Downgrade
[4] Uninstall
[5] Self Check
[6] Get Default Info
What would you like to do? 6
> You chose: Get Default Info.
If you have initialized the OpenResty Edge Admin database using the current installer, then the information to log in to the Edge Admin Console is as follows:
username: admin
password: xxxxxxxxxxxxxxx
4. Automated installation of OpenResty Edge
You can also use a non-interactive installation to install OpenResty Edge.
Example 1:
sudo bash openresty-edge-installer.sh -a install -c node -v 23.12.1 -m 192.168.10.1 -l 192.168.10.2
Install the 23.12.1 version of OpenResty Edge Node and modify the corresponding configuration of Edge Admin Host and Log Server Host in the configuration file.
Example 2:
sudo bash openresty-edge-installer.sh -a install -c admin -v 23.12.1 -d 192.168.10.3 -l 192.168.10.2 -s /tmp/cert.crt -k /tmp/key.crt
Install 23.12.1 version of OpenResty Edge Admin, modify the corresponding configuration of Database Host and Log Server Host in the configuration file, and configure the SSL certificate of Edge Admin Console to /tmp/cert.crt and /tmp/key.crt.
The openresty-edge-installer.sh script currently supports the following parameters:
    -a, --action                install, upgrade, downgrade, uninstall.
    -c, --component             admin, log-server, node, log-server-db, admin-db, rebuild, clean-db.
    -p, --plus-version          use in downgrade, example: 1.19.3.1.36-1.
    -d, --db-host               specify database host, which can be used when installing admin and log server.
    -m, --admin-host            specify admin host, which can be used when installing node.
    -s, --admin-ssl-cert-path   specify ssl cert path for admin console.
    -k, --admin-ssl-key-path    specify ssl key path for admin console.
    -i, --admin-ssl-skip        skip configuration of admin ssl certificate.
    -l, --log-server-host       specify log server host, which can be used when installing node and admin.
        --backup-db             if exist, will backup db when upgrade admin db.
    -b, --listen-ip             specify the listen ip when install edge node, install edge admin or upgrade edge admin.
    -u, --skip-db-sec-config    do not change the database's default listening address, nor alter the default postgres user's password, etc.
    -h, --help                  help info.
5. Database Backup and High Availability (Optional)
We provide two ways to make sure data security. We strongly recommend using both methods to make sure data security.
6. Getting Started
We provide online documents, and related blog posts and corresponding video tutorials.
7. More
If you have any questions, please feel free to contact us.